Colorful DIY Felt Easter Eggs. Making felted Easter Eggs is super fun and easy! Not only is this a great Easter craft project for kids but it is a wonderful way to explore wool felting for beginners.
Here is a fun and unique way to decorate your Easter Eggs by covering them with colorful felted wool fabric rather than the traditional Easter Egg Dyes Tablets.
There are so many fun ways to color Easter Eggs with paint speckles and decoupage to printing with silk ties. Why not try something new this Easter with this fun wet wool felting technique?

How do you felt Easter eggs? Here are the basic steps:
- Wrap wool roving around a plastic egg form
- Add soap and waterr
- Work the wool with your hands

What are Felted Easter Eggs?
It may sound complicated but wool felting is actually really easy. Basically, all you are doing is wrapping a plastic Easter Egg with wool roving.
Then, when you apply warm water, soap and agitation, it causes the wool fibers to open up, interlink and adhere to each other.
As you continue to work the wool on the egg, the fibers bond together forming a layer of felt.
Have you ever accidentally put a wool sweater in the washing machine and shrunk it? That is the same thing except this time we are doing it on purpose.
Trust me, it’s easy! By the way, this is also a great Easter craft for kids.
Just a little background … a few years ago, when I first started getting serious about FiberArtsy, I shared a tutorial on how to make felt Easter Eggs.
Yikes! Did you see it?? The tutorial itself was pretty good and accurate but the photos?? Ick!
Consequently, I decided to make up a whole new batch of felted Easter Eggs to show you how pretty they can really be (and how much better my photos are now :).
Useful Supplies
– Wool Roving – Any kind (sheep, alpaca, etc)
– Plastic Easter Eggs
– Nylon Hose (Knee Highs work well)
– Warm water & dish soap
– Washer
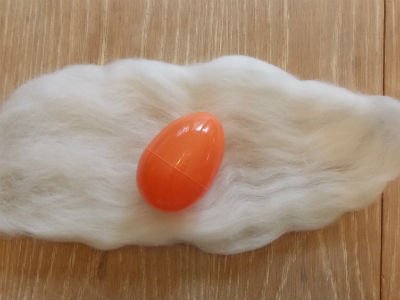
For this tutorial I used this raw wool fiber and roving:

What is the difference between Raw Wool, Uncarded Wool and Wool Roving?
Raw wool has not been processed. It is basically wool locks as they were shorn off of the animal (sheep, goat, alpaca, etc.)
Uncarded Wool is also unprocessed but it may have been washed but not carded or combed.
Wool Roving is wool that has been washed and carded (combed) so that the fibers all line up in the same direction. This makes the wool easier to work with.
How do you make felted Easter Eggs? Step by step instructions:
Wrap the wool around the Easter Egg
The step by step wet felting instructions are basically the same, regardless of whether you use uncarded wool fiber or roving. Specifically, you wrap the Easter egg inside the wool.
Most importantly, you just need to make sure to cover each part of the plastic egg with a good, thick layer of the fiber.
(Hint: put a piece of tape all around the egg along the joint to keep it from coming apart)
First, you need to take a piece of roving and thin it out fairly evenly. Just gently tug the fibers apart until you have a thin layer.
Next, place one of the plastic eggs in the center and wrap the sheet of roving around it, tucking in the corners as much as you can.
Then you want to take a second strip of roving and wrap it around the egg, but place it in the opposite direction of the first layer.
Just make sure that the entire egg is completely covered with wool. If you find an big lumps, tuck those into the wool as are harder to felt than thinner areas.


Felt the wool around the egg
Now you will start the actual felting process. Begin by sprinkling the wool wrapped egg with warm, soapy water.
Using your hands, gently work the water all the way into the fiber. The wool will be very loose and slippery at first but will firm up the more you work it.
At this point you can also add decorations such as yarn or wool locks, if desired. Go ahead and wet the yarn and/or decorations.


Wash & dry the egg
Work the wet fiber with your hands for a few minutes, just to begin the felting process.
Now, carefully place your felt eggs in the panty hose and tie a knot at the top of each one to secure the egg. You want good contact between the nylon hose and the wool.
Place your eggs in the washing machine, add detergent and hot water and run through a normal wash cycle.

When the washer is finished, remove one of the eggs and check the felting. Is the wool firm and holding together? Then you can go ahead and remove the hose.
However, if the wool is still very loose and coming apart, you will want to run them through another wash cycle.
Once they are all thoroughly felted, carefully cut the nylon hose from all of the eggs and lay them out to dry completely. Usually overnight or longer.
Here are my newest felted eggs:

Hand Dyed Merino Sheep Wool in Turquoise to Burnt Orange

Marbled Felt Easter Egg with Natural White Wool Roving and Black Fiber Veining


That’s all there’s to it. This project is a really great way to learn wool or wet felting.
It is also really fun for kids to do. Children are naturally great at wet felting and they love being able to play with soapy suds and wool.
Enjoy!
Annette
FiberArtsy
How Do You Needle Felt an Egg?
Another option for making a felted Easter Egg is by needle felting. Instead of felting the wool with water, soap and agitation, you use a special felting needle to ‘tangle’ or felt the wool.

If you are new to needle felting, here is a great video for beginners which shows you how to needle felt an Easter Egg.
Why is my wool not felting?
There are a couple of possible reasons for this. First, if one of your wool layers is too thick, the water and soap will have a hard time getting inside and dry wool will not felt without a needle.
Also, not using enough water can keep it dry on the inside. Another reason could be that you need to work it more with your hands. The agitation is an important part of the process.
Related Easter Egg and Easter Craft Ideas
Silk Tie Printed Easter Eggs
Natural Dye Easter Eggs using Onion Skins
Easter Egg Ideas for Adults and Children
DIY Easter Eggs Decorated with Yarn
How to Dye Yarn with Easter Egg Dyes
Related Wool Felting Articles
What is Felting? A Complete Beginner’s Guide
How to Needle Felt (for Beginners)
Part 1 – Basic Felting
Part 2 – How to Felt Wool – Cobweb Felting
Part 3 – Nuno Felting
Part 5 – Resist Felting
Wet Felt: Adding Color & Texture the Easy Way
How to: Lattice Felting
How to Make Felted Dryer Balls
DIY Wool Dryer Balls with Needle Felt Designs


