How to make Cute and Fun Needle Felt Designs on Homemade Wool Dryer Balls
So, I have been on somewhat of a needle felting kick lately. Needle felting is so much fun!! And I have also been trying to think of what to do with the wool shapes I make using cookie cutters. Well, I thought …. why not make some fun DIY wool dryer balls with cute little needle felt designs on them?
For this project, you can either make your own dryer balls (read on) or to make it easier, you can use premade dryer balls.

What are Dryer Balls?
First off, for those of you who are not familiar with dryer balls …. they are balls that you put in the clothes dryer to help fluff your laundry and reduce static.
Did your Mom ever put tennis balls in the dryer?
Mine did. (Side note: don’t use tennis balls … they release toxins).
For this tutorial, I am specifically talking about balls that you can make with raw wool, roving or wool yarn. They are basically balls of wool that has been felted. They are completely natural and non toxic!
How to make your own wool dryer balls
Making your own wool dryer balls is super easy but if you don’t want to fool with it, you can buy 100% Wool Dryer Balls. As long as they are made with 100% Wool, they’ll work great for this needle felting project.
To make your own Wool Dryer Balls, head on over to this tutorial which will show you the instructions step by step. Once you have made your dryer balls, come back here for the tutorial on how to dress them up with needle felted wool shapes.
CAUTION!!! Felting Needles are wicked sharp!!! Needle felting is NOT appropriate for children.
Useful Supplies
- 100% Wool Dryer Balls (or make your own)
- Felting Needles and Tool
- Needle Felting Pad or Sponge
- Wool Roving
- Cookie Cutters
- Finger Protectors (optional but recommended)


Dyed Sheep Wool Roving

Hint! Top keep your felting needles from rolling around while not in use, place a piece of styrofoam on the needle tips.
Needle Felting a Shape
You may remember, I shared the basic step by step instructions of how to needle felt with a cookie cutter in this Needle Felting for Beginners Tutorial.
Therefore, I won’t go into the full detail here but I am going to show you the basics you need to make your own fun felted designs.

To begin, set your felting pad or sponge on a flat surface. Next, you will need to prepare your wool. Since thick wool is more difficult to needle felt than thin wool, you will need to open up your fibers.
To do this, simply take a section of the wool in one hand and gently pull it open with the other.

Once your wool is opened up, place it inside one of the cookie cutters, making sure to evenly space it out.
You don’t need to fill the entire cookie cutter but make sure it covers the entire bottom all the way to the edges. You want the wool to be felted right up against the side of the cookie cutter.
Also note, several thin layers are better than one thick layer. It is harder to poke the needles through a thick clump of wool and they also are more prone to breaking.

Felting the first side
When you are ready, using either a single felting needle or a needle felting tool, begin poking the needles through the wool and into the felting pad and back out.
To help keep the needles from breaking, pull the needles back out at the same angle that they went in. Do this all along the surface of your wool, paying special attention to the edges.
After a few minutes of felting, remove the cookie cutter. Working your fingers along the edges, gently peel away the wool from the felting pad. At this point, your piece is not completely felted. If you pull on it, the fibers will still come apart.

Felting the other side
You can add more wool if you feel the piece is too thin. There is no right or wrong here. You just need to keep in mind that this will be felted onto a wool dryer ball so it does not need to be thick.
Also Note: Since we will be felting this onto a wool ball, it does not have to be completely felted. If this was the final fabric, you would keep felting until the fabric becomes fairly firm.

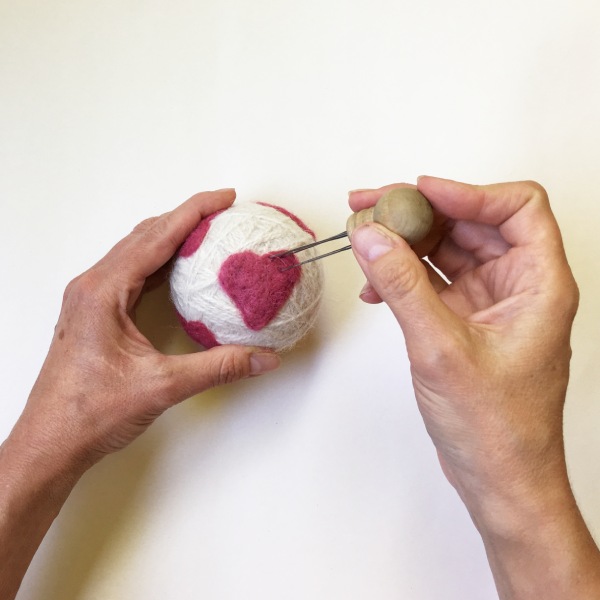
Felting the designs onto wool balls
Now you are going to transfer your felted shape onto a dryer ball. The basic process is the same as before.
Set a dryer ball onto a flat surface and hold it firmly in place. Place the needle felted piece on the ball and very slowly and carefully begin poking the felting needles through to the dryer ball.
You will repeat this until the piece is attached to the dryer ball and doesn’t come off easily.
Test the felting by gently tugging on the needle felted shapes. If they come off the ball, you have to work them some more.
SAFETY NOTE: DO NOT hold the dryer ball in your hand while you are actively needle felting on it. (like I did in the first photo). Hold the ball firmly on a table and GO SLOW! Remember these needles are super sharp!


There you go, that is how easy it is to make your own wool dryer balls with fun designs on them. And you are not limited to using just the cookie cutter shapes.
If you have trouble finding a cookie cutter in the shape you want, all you have to do is needle felt a larger sheet of wool and cut out the shape you want using fabric scissors. (That is how I made the crescent Moon shapes.)
How do you use dryer balls?
Once the shapes are firmly attached, you are ready to put them to the test! To use your dryer balls, simply toss 3 or 4 balls into the dryer with your laundry. They will help to fluff your clothes, cutting down on drying time. Dryer balls also help to cut down on static cling.
But the best part of these designer wool balls is that they are all natural and eco friendly! No chemicals, no toxins. Plus, you will save lots of money instead of buying dryer sheets that may contain harmful substances. Win Win!
Oh and they also make a fabulous DIY Gift Idea!


Finally, now that you’ve made your own super fun diy wool dryer balls, you might be interested in this article from Real Simple on 10 Eco-Friendly Laundry Tips.
Related Wool & Felting Articles:


