You see a Snow Day … I see a SNOW DYE day! I love when we get a bunch of snow and I can have some snow dyeing fun.
Well, we just had a big snowstorm and so of course my first thought was DYEING! It is basically the same technique as Ice Dyeing but you use snow instead.
And I must say there is something more fun about going outside and scooping up snow rather than driving to the gas station to buy ice.
The first thing I had to do was gather up my supplies. Since this is a cold dye process, I needed natural, plant fiber yarn or fabric (i.e. cotton, linen, bamboo) and Fiber Reactive Dyes. (Wool yarn (animal fiber) needs Acid Dye (a heat dye) so it won’t work for this.)
So, go grab your supplies and let me show you the fun of snow dyeing fabric and yarn.
How to Snow or Ice Dye – basic steps:
- Soak materials in Soda Ash and water
- Fold your fabric and secure with rubber bands
- Place all in large container and cover with snow
- Sprinkle the dyes on top
- Rinse and dry

Here’s something new …. REVERSE TIE DYEING – see the different patterns
What is Snow Dyeing or Ice Dyeing?
Ice dyeing aka snow dyeing is a fun, mostly hands-off fabric and yarn dye technique that produces one of a kind patterns.
Instead of the dye being applied to the material, it is placed on top of the ice or snow. As this melts, the dyes liquify and move down, creating wonderful, random patterns and blended colors.
Natural plant fibers like cotton, linen or bamboo use fiber reactive or cold water dyes so they are the perfect choice for snow dyeing.
So, for this experiment, I decided to ice dye tie dye (say that a few time real quick) my favorite cotton flour sack towels and some cotton yarn.
Did you see my Ice Dyeing Tutorial?
Supplies needed
- Plant Fiber Fabric s/a Cotton Flour Sack Towels
- Cotton, Linen or Bamboo Yarn
- Procion MX Dye
- Soda Ash
- Container to soak materials to be dyed **
- Container for dyeing (I used an old Crock Pot) **
- Wire rack ***
- Snow or Ice
- Rubber Bands
- Dust Mask
- Gloves
- Measuring Cup
- Water
- Chopsticks
** You will need one large container to soak your materials in the soda ash/water mixture. This can be a large plastic tub or bucket.
Also, you will need a large container for the actual dyeing process which has tall sides to hold the snow or ice. I used an old Crock Pot (dedicated to dyeing only).
Note: you can use the same container for soaking and dyeing!
*** The wire rack needs to fit inside your dyeing container and keeps the fabric or yarn raised. As the snow or ice melts, it (and the dye) will pool at the bottom of the container.
If you don’t have a wire rack to fit, you can simply use an old aluminum pie plate with holes punched in it or balled up pieces of foil.
Dyeing Safety
Safety Note:
NEVER use pots, pans, measuring cups etc. that are used for food prep.
ALWAYS wear a face mask when handling dry dye powder.
Helpful Tip from Gail Callahan Hand Dyeing Yarn and Fleece: Cover your work surface with newspaper and spritz them with water. This will attract dry dye particles that may escape.

Soak the Cotton Materials
The first thing you need to do is soak your yarn and fabric in a Soda Ash and hot water solution for about 20 minutes. This helps the fiber reactive dyes to ‘set’ or become colorfast and washfast.
The basic ratio is 1 Cup Soda Ash to 1 Gallon of Hot Water. If you don’t plan to dye many items, you may want to start out with half of that i.e. 1/2 Cup to 1/2 Gallon.
Note: The Soda Ash/Water mixture can be saved in a lidded container for your next dye project. I keep mine in a large mason jar.

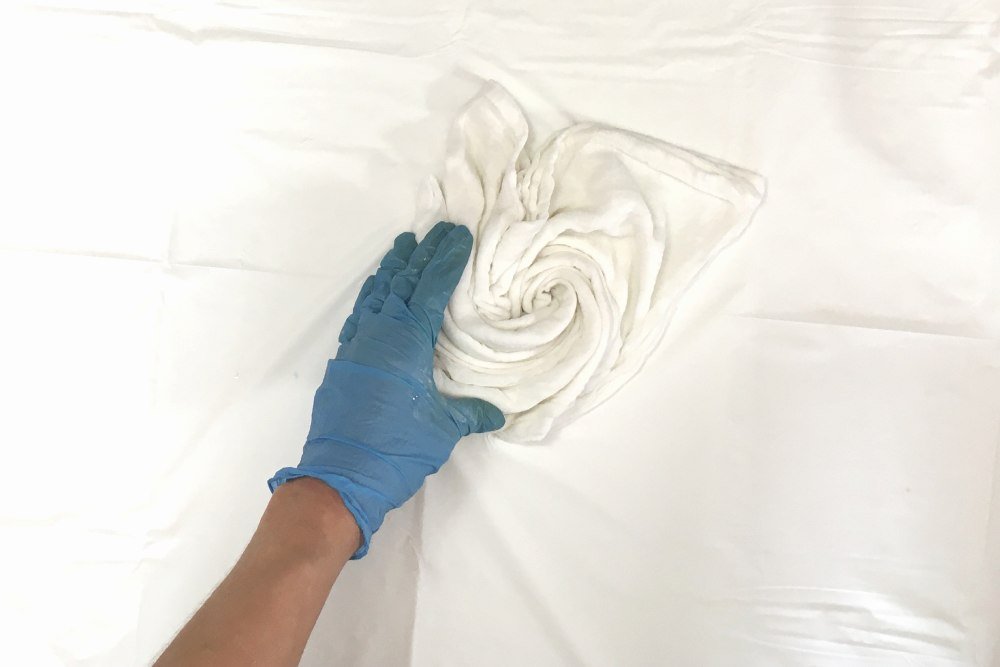
Fold the Fabric
Take the fabric out the Soda Ash and squeeze out the excess liquid. Now, you will want to fold or scrunch your fabric. This will create designs in the dyes.
I did a simple spiral fold and secured it with the rubber bands.
Honestly, I was a little sloppy in my folding or the colors would have been a bit more crisp.


Add the Dyes
First, place the wire rack in your Crock Pot or other container. (See my note below about how I messed this one up!)
Then, lay the folded towel and yarn, if using, on top of the rack. Now, you want to go outside and gather up the snow!
Your container should be filled to the top with snow so get more than you think you will need.

Finally, the fun begins! Put the dust mask over your nose and mouth, then go ahead and open all of your dye containers.
Pick up your first color and, using the chopsticks, carefully sprinkle a bit of dye onto the snow. Only a little bit at first.


Repeat with two or three more colors until the snow is just covered. You don’t want to add too much dye or too many different colors.
For this experiment, I used Raspberry, Lime and Aqua Marine.
Once you are finished adding dyes, put a top on the container and let it sit until the snow has melted or overnight.


Rinse the dyed materials
Now you wait for the snow to melt. Ideally, you want to let your items sit with the dye for at least 24 hours total.
After the wait time, put your gloves back on and remove the towel and yarn. Careful, it will drip so you may want to do that in the bathtub or sink.
Now you need to rinse, rinse, rinse with water until it no longer bleeds color. Then you can go ahead and wash the fabric, separately, in your washing machine and hang it to dry.
Your freshly dyed tea towel (or T Shirt) and yarn are now ready to use.
My Ice Dyeing Mistake!
I was so excited by the snow and dyeing that I totally forgot about the wire rack! In my previous ice dyeing experiment, I used a cooling rack to raise the cotton fabric off the bottom.
When I noticed my goof, I totally expected my stuff to be ruined!
Dyeing 101 says that if you mix a bunch of colors together, you will end up with a yucky, muddy brown so that is what I thought I would get.
Surprise, surprise that did not happen at all. In fact, the sections of my towel and yarn that were touching the bottom of the Crock Pot were mostly white. Why would that be??
My only explanation is that the melting snow filled up the bottom so that when the dye migrated down, it simply floated on top. There was no movement to mix the dye with the clean water below.
If you know of a better reason, by all means let me know in the comments!
How long do you let snow dye sit?
Fiber Reactive Dyes work best when they are allowed to sit for 24 hours at least. So, even if your snow has already melted, just let the dye continue to work the whole time before rinsing.


Related Fabric Dyeing Posts


