Easy way to upcycle and repurpose an Old Sweater into fun DIY Fingerless Gloves
Like many others, I am trying very hard to be more environmentally aware and responsible. One way to do that is repurposing old clothing. So, I decided to find out how to make DIY fingerless gloves out of old sweaters.
Lucky for me, our local Goodwill had a great selection of old men’s sweaters which means more fabric for me! The only other thing you really need is a super sharp pair of fabric scissors and needle & thread.
Basic steps for making fingerless gloves from an old sweater:
- Cut sleeves off the sweater
- Turn a sleeve inside out, fold over 1″ of the cut edge, pin and sew
- Hem the edge
- Place hand inside the sleeve and pin fabric between thumb and index finger. Sew the thumbhole
- Repeat steps to make the second glove

Personally, I really love fingerless gloves. They are generally not as bulky as regular gloves or mittens and you can still do your work like writing or typing on the computer. And how cool is it that we can repurpose old sweaters or sweatshirts to make our own fingerless gloves.
I was shocked to discover that the majority of clothes that are donated to thrift stores end up in the landfill. Yes! Most of the clothes we give away, get thrown away. That was very upsetting!
Well, we can do something about that. So, I have been on a quest to figure out different ways to make things out of old sweaters, t shirts, blue jeans and more.
How to Make Fingerless Gloves from an Old Sweater
I don’t know about you but I am not the best at knitting or crochet. Honestly, I can crochet a rug or coaster but that is probably as good as it gets. But, this easy project is perfect for me.
Repurposing a sweater into fingerless gloves is so easy to do! And they are also much easier to sew than regular mittens. This whole project is a super quick with minimal sewing and absolutely no knitting or crochet required.
Supplies
- Old Sweater
- Fabric Scissors or
- Rotary Cutter and Cutting Mat
- Needle and Thread or
- Sewing Machine
- Sewing Pins
- Ruler

Old Sweater for making DIY Fingerless Gloves

How to Measure and Cut the Sleeve
The first thing you have to do to make these DIY fingerless gloves is decide how long you want your gloves to be. This is entirely up to you.
I personally, have several pairs of handmade fingerless gloves, some on go to my wrist while other reach the elbow.
I have found that the short ones don’t interfere as much when I’m working on the computer. The longer gloves come in handy when the weather is really cold and I can pull my coat sleeves over them.
That said, cut your gloves a little longer than you think you need. You can always go back and make them shorter.
Now, just take your fabric scissors or rotary cutter and cut the sweater sleeves about 1″ longer than you want your final gloves to be. This is to allow for the hem.
I wanted my gloves to be 9″ long so I cut the sleeves 10″ from the cuff.
Please note: If your sweater is very bulky, you may want to pin the edges before cutting them to keep it from raveling.

How to Hem the Glove
The first thing you need to do is hem the glove to keep it from raveling. Turn the sleeve inside out and then fold over about 1″ of the cut edge.
Next, pin the folded edge in place and then stitch all the way around.
As I said before, if your sweater is particularly bulky, you may need to stitch two seams. (Sorry, I didn’t get a photo of this step)
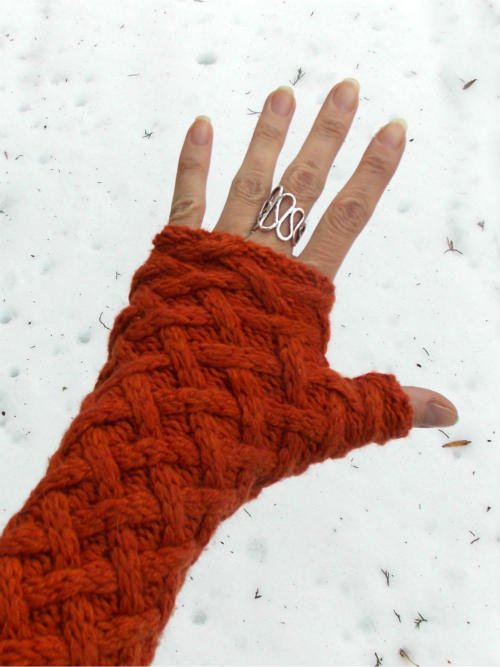
Sewing the Thumb Hole

Just so you know, creating a thumbhole in the glove is completely optional. Many diy fingerless gloves I have seen do not have one. That said, I prefer for my gloves to have a little more structure so that they don’t move up my arm.
You now need to figure out where to stitch the seam for the thumb. It may be helpful to have another person for this step.
Turn the sleeve inside out and place one of your hands inside the sleeve. Now, carefully place pins where you need to stitch your seam. Then, on the inside of the sleeve, sew a ‘V’ between thumb and forefinger.
I double stitched mine to make sure it would hold up. Finally, you want to carefully cut out the ‘V’ making sure to not cut through the stitches.
Now you just turn the glove right side out and repeat the above steps with the second sleeve. My sleeves were nice and snug on my arms. If yours are too loose, simply fit them to your arm, pin and sew along the inside.
That’s all there’s to it. This really is a great way to repurpose an old (maybe ugly) sweater. And hey, these fun fingerless gloves are also a great gift idea for Christmas or Birthdays.
Enjoy!
Annette
FiberArtsy
How Do You Make Fingerless Gloves from Socks?
Personally, I have not tried to make any fingerless gloves from old socks. However, I did find this great article which shows you not only that, but also how to sew and how to knit fingerless gloves.
Related Fabric Crafts
- DIY Boot Cuffs from an Old Sweater
- Wine Bottle Gift Bag from an Old Sweater
- How to Make TShirt Yarn
- 17 Fabric Scraps Projects
- How to Make Denim Yarn from Old Jeans
- How to Stencil on Fabric and Paper
- 25 Fall Crafts with Burlap Fabric
- Paint those Ugly Shorts – Fabric Dyeing 101
- Fun Spring Fabric and Fiber Crafts
- 23 Tie Dye Ideas and Projects
- How to Tie Dye a Heart Shape
- What to do with an Old T Shirt
- 12 Denim Crafts Projects


