• Skip to primary navigation
  • Skip to main content
  • Skip to primary sidebar
  • Skip to footer
  • DYEING
    • Eco Printing and Eco Dyeing
    • Yarn Dyeing
    • Fabric Dyeing
    • Natural Dyeing
  • FELTING
    • What is Felting? A Beginner’s Guide
    • How to Needle Felt (for Beginners)
    • Wet Felting Tutorials
    • Needle Felting Tutorials
    • Fiber 101
  • PATTERNS
    • Pattern Roundups
    • Free Indie Crochet Patterns
    • Free Indie Knitting Patterns
  • CRAFTS
    • Home Crafts
    • Holidays
      • Christmas
      • Easter
      • Gift Ideas
  • E-BOOKS

FiberArtsy.com logo

menu icon
go to homepage
  • DYEING
  • FELTING
  • CRAFTS
  • PATTERNS
  • E-BOOKS
  • search icon
    Homepage link
    • DYEING
    • FELTING
    • CRAFTS
    • PATTERNS
    • E-BOOKS
  • ×

    How to Paint Alcohol Inks on Switch Plates and Outlet Covers

    Updated: Jun 1, 2022 by Annette Browning

    Disclosure: This page may contain affiliate links. If you click and buy, we may receive a commission.
    See Disclosure for details.

    Add a Super Cool Pop of Color to Your Home Decor with these Decorative Switch Plates and Outlet Covers painted with Alcohol Ink

    This may have been my alltime favorite craft project so far! I had so much fun making these colorful switch plates and now I am going to show you how easy it is to paint your home’s outlet covers with vibrant Adirondack Alcohol Inks by Tim Holtz.

    Last fall, I decided to repaint my entire house. Big job but I was sick and tired of the ‘builder beige’ walls so it was totally worth it!

    Now, my soft gray walls with fresh white trim look so much better. While I love my walls, I did notice they needed a little something…. some pop of color. So, I thought … why not try painting the outlets and switch plates?

    Table of Contents

    • What are Alcohol Inks?
    • Alcohol Ink Supplies
    • Prep the Outlet Covers and Switch Plates
    • Apply the Alcohol Inks
    • Seal the Painted Outlet Covers

    In the past, I have decorated my light switch covers with fabric and wallpaper but this time I wanted something a little different. Something more modern and cool. And then I ran across the Adirondack Ranger Alcohol Inks!

    Plain white switch covers are just so boring and dull, aren’t they? And we can’t get rid of them so why not do something fun? And while I love supporting my local artist community, I could not afford to buy custom, artist painted or ceramic covers for the whole house.

    Switch Plates and Outlet Covers painted with Alcohol Inks
    Outlet Covers painted with Adirondack Alcohol Ink by Tim Holtz


    What are Alcohol Inks?

    If I understand it correctly, Alcohol Inks are a blend of pigment and a form of rubbing alcohol with a consistency of watercolor paints. The colors are translucent and very fast drying.

    Alcohol Inks are especially designed to work on hard surfaces such as metal and glass however, they can also me used on canvas and paper.

    When I discovered alcohol inks at Michaels, I couldn’t wait to try them out and I absolutely fell in love with the unique watercolor effects you can achieve.

    Plus, they are super easy even for beginners to use. So, let me show you how to add a pop of color to your home switches.

    Related: Look how I made Alcohol Ink Christmas Ornaments
    Related: You may like DIY Glass Garden Art Totem

    Disclosure: This page may contain affiliate links which means if you click and buy,
    we may receive a small commission. See full Disclosure for details.


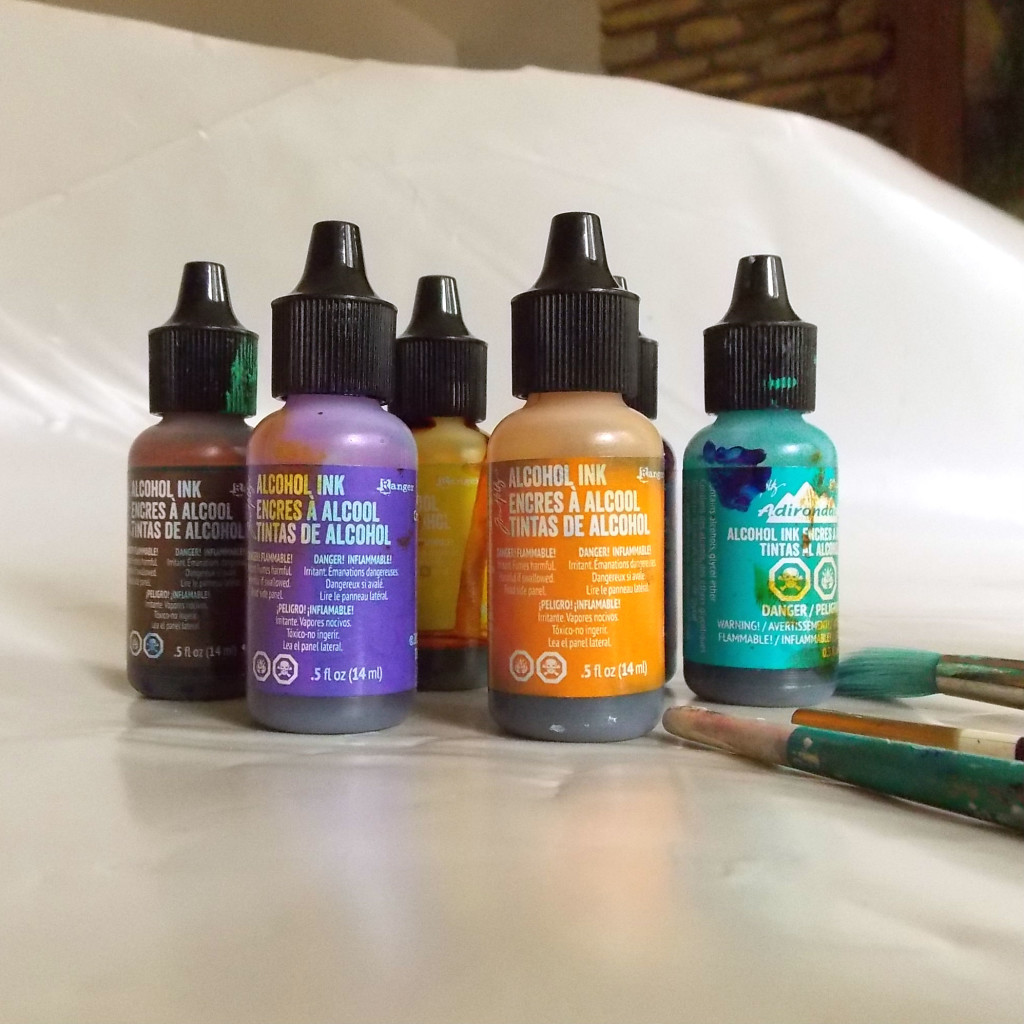
    Alcohol Ink Supplies:

    • Adirondack Alcohol Ink by Tim Holtz
    • White or Light Switch Plates or Outlet Covers
    • Rubbing Alcohol
    • Drinking Straw (optional)
    • Clear Acrylic Spray Sealer
    • Table cover
    • Gloves (optional)
    • Plain sheet of paper
    bottles of alcohol inks image of paint brushes image of white switch plates can of spray sealer
    Ranger Alcohol Inks by Tim Holtz
    blank outlet covers, Ranger alcohol ink, paint brushes and rubbing alcohol


    Prep the Outlet and Switch Plate Covers:

    Cover your table with a plastic table cloth. Trust me, you don’t want alcohol inks on your table.

    The first thing you want to do is give your switch plates a good cleaning. Any fingerprints or stains can keep the inks from adhering to them.

    Next, pour about 1/2 cup or so of rubbing alcohol in your disposable cup. ow, place one of your outlet covers on the piece of paper and open all of your bottles of alcohol ink. This paint dries very quickly so I have found it is best to go ahead and open all of the bottles ahead of time.


    Apply the Alcohol Inks:

    There are many different ways to use alcohol inks, this is just what I did:

    Dip your paint brush in the rubbing alcohol and completely cover one of the switch plates or outlet covers. Make sure it’s totally wet.

    Now, drip some alcohol ink onto the rubbing alcohol and watch it flow. You can move the ink around with a brush or blow it with the straw.

    Drip Alcohol ink on the light switch covers, FiberArtsy.com

    Add more ink colors slowly, one drop at a time. And don’t forget the edges and the tops of the screws. You will want those to match.

    Add second color of alcohol ink
    Add more alcohol ink


    Seal the Painted Switch Covers:

    Let your painted plates dry overnight. Now, carefully carry the plates outside (on the paper) and spray them with a thin coat of acrylic sealer. Hold the can of spray as far away as you can.

    The pressure from the spray will move the dried inks a little bit but the paint will blend back together before it dries. Wait the recommended time on the spray and add a second coat.

    Let dry completely and you’re ready to install your beautiful DIY switch plates.

    Seal the alcohol ink on the plate covers
    DIY Switch Plate Covers, FiberArtsy.com

    Don’t you just love the bright colors? Why live with plain, ugly light switch covers when you can have little works of art instead? I get compliments on my light switch covers all the time.

    They are so lively and colorful on my neutral gray walls without being overpowering or gawdy.

    Now that you know how to use alcohol inks, why not paint some fun and funky coasters? Great Gift idea! Just make sure to use an extra strong sealer if the piece will get used a lot.

    My switch plates have held up amazingly well. The only one showing some scratches is the outlet we use to charge our cell phones all the time. The rest of the switches and outlets are not showing any wear at all.

    Here is a super cool video of Tim Holtz demonstrating how to use his alcohol inks:

    Check out my Alcohol Ink Christmas Ornaments!

    Enjoy!
    Annette
    FiberArtsy

    And, if you don’t want to make your own painted switch plate covers, you can also buy these beautiful covers.

    image of painted light switch cover
    Painted Outlet Covers and Switch Plates

    Related Home Decor Articles

    How to Make a Glass Garden Totem
    Christmas Ornaments Painted with Alcohol Inks

    Painted Light Switch Cover
    How to use alcohol inks. You can decorate your walls with colorful switch plates and outlet covers!
    DIY Alcohol Ink Art Outlet Covers. Add a pop of Color to your Home Decor by painting your outlet covers and switch plates with Alcohol Ink.
    Alcohol Ink Painted Outlet Covers

    How to Paint Alcohol Inks on Switch Plates

    Sharing is caring!

    12682 shares
    • Share

    About Annette Browning

    Annette is a long time fiber artist and former alpaca farm owner. She shares her love of dyeing, felting, crochet and knitting as well as other craft projects.

    Reader Interactions

    Comments

    1. Cynthia Nye says

      March 07, 2017 at 11:56 am

      Very pretty. Instead of spray acrylic to seal, could clear poly be used? I’m thinking of a different application.

      • Annette says

        March 07, 2017 at 6:05 pm

        I don’t see why not. My only concern would be disturbing the dried ink with a brush. Let me know if you try it.

    2. Barb Larson says

      March 07, 2017 at 12:13 pm

      Beautiful, and I have a day off. I already have everything I need, I’ll be doing these this afternoon. Thanks!

      • Annette says

        March 07, 2017 at 6:07 pm

        That’s great! I’d love to see your results so please share some pix.
        Thanks
        Annette

    3. Toni Barnett says

      March 08, 2017 at 1:33 pm

      A project I can do with my grandson! He’s quite artistic and would really enjoy creating something functional like this. And I would like to make a trivet using a large square ceramic tile.

      • Annette says

        March 08, 2017 at 7:24 pm

        Great idea! Let me know how it they turn out. I’m also thinking picture frames 🙂

    4. slj says

      March 10, 2017 at 11:52 am

      Lovely. What color inks did you use for the 3 switch plate and its 1 switch plate companion? Thanks.

      • Annette says

        March 10, 2017 at 4:24 pm

        Hi there,
        Those were done with Sunshine Yellow, Sunset Orange, the dark blue and teal (I can’t find the specific name of those colors) and I believe some of the dark brown. All of mine were done with Adirondack Alcohol Ink brand.
        Thanks!
        Annette

    5. Rita O'Neil says

      March 17, 2017 at 2:26 pm

      I accidentally ordered Dr.Ph.Martin India ink, will this work or am I out of luck? Ty

      • Annette says

        March 17, 2017 at 4:30 pm

        I’ve never heard of those but I checked out the description and it says they work on almost all surfaces. Looks like they should work fine. Give em a tray and let me know how it turned out.
        Happy Friday 🙂
        Annette

        • Rita O'Neil says

          March 17, 2017 at 5:39 pm

          Thank you so much ! I will definitely let you know.

    6. Roslyn Banks says

      May 29, 2017 at 3:44 pm

      Thank you for your tips and tutorial. I’ve done the ceramic tiles and ready to do some plates. I’m not a “painter” but I’m enjoying the designs I’m making using alcohol inks.

      • Annette says

        May 30, 2017 at 7:08 am

        Aren’t they fun?? I love the organic patterns you get with alcohol inks.
        Thanks for visiting 🙂
        Annette

    Primary Sidebar

    WELCOME! We share tutorials for Dyeing Yarn and Fabric, Natural Dyeing, Eco Printing, Felting, Knitting and Crochet Patterns as well as Crafts.

    • Facebook
    • Instagram
    • Pinterest
    • Twitter
    • YouTube

    Footer

    stay connected

    • Facebook
    • Instagram
    • Pinterest
    • Twitter
    • YouTube

    What’s New!

    image of yarn with different colors of dye
    image of a tie dyed shirt

    Get Free Updates!

    Be the first to find out about our new Tutorials and Giveaways  (Unsubscribe at any time!)

    Thank you!

    You have successfully joined our subscriber list.

    .


    FELTING         DYEING         PATTERNS        CRAFTS         E-BOOKS         RESOURCES        ABOUT      DISCLOSURE      ACCESSIBILITY STATEMENT        PRIVACY POLICY       


    As an Amazon Associate, this site earns from qualifying purchases by linking to Amazon.com and affiliated sites.


    Affiliate Advertisements: This site participates in various Affiliate Programs. This simply means that if you click through an affiliate link and buy a product, we may get a small commission, at absolutely no extra cost to you.

    Copyright © 2023 FiberArtsy.com on the Brunch Pro Theme

    12682 shares